 Save
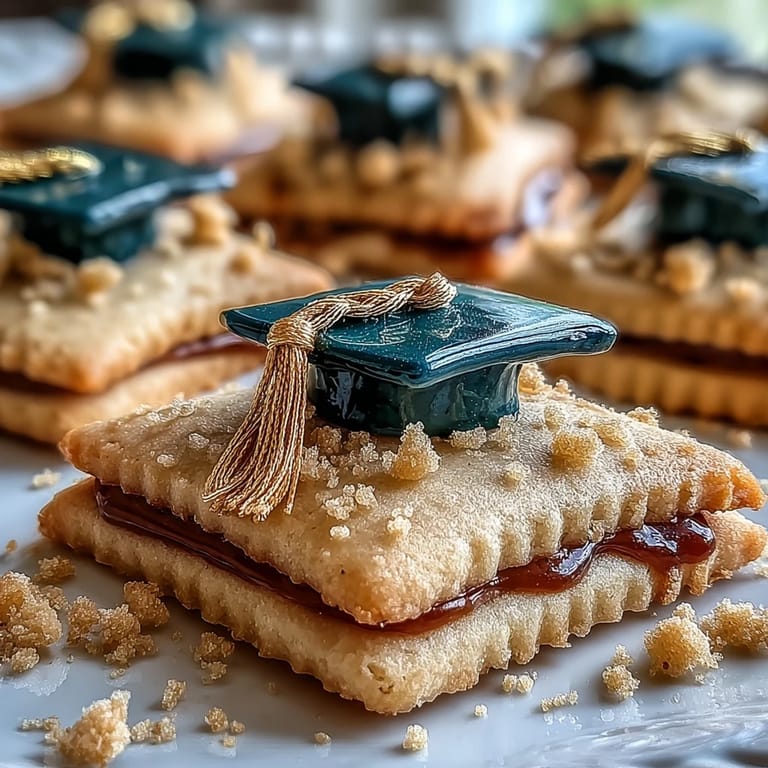
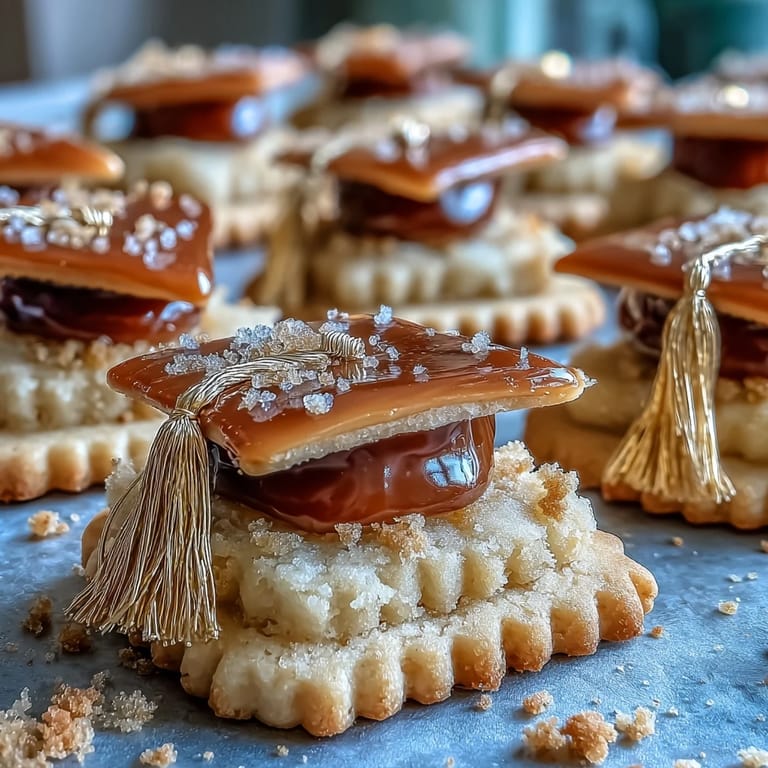
Save The scent of sweet butter always seems brighter when I'm baking for a celebration, and these graduation cookies somehow capture that joyful energy in every bite. Last year, on the morning of my cousin's ceremony, sunlight streamed across my kitchen table, glinting off little bowls of sparkling gold dust. For once, the rush of icing and shaping didn't feel like work: it was pure anticipation for a day worth honoring. These buttery sugar cookies, dressed up as diplomas and caps, became my way to cheer for someone I love. Sometimes, the fun is in the small, golden details.
I remember piping tassels onto these cookies while FaceTiming with my friend whose daughter was graduating—she coached me through the gold accents and teased me every time my hand shook. By the end, we compared our not-so-perfect cookies and laughed about who would notice first: the graduates, or their hungry siblings. There's a unique joy in baking something that celebrates more than just a sweet tooth.
Ingredients
- All-purpose flour: Go for a level scoop to avoid dense cookies—I've found that weighing the flour ends up with consistently tender dough.
- Unsalted butter: Let it soften, but not melt; too warm, and your shapes won't hold as sharply when baked.
- Granulated sugar: Creaming well with butter gives those dreamy, slightly crisp edges.
- Egg: Room temperature blends better, ensuring a pillowy dough.
- Pure vanilla & almond extract: Vanilla is non-negotiable for that classic flavor, and almond boosts the bakery aroma—lemon works if you're in the mood for something lively.
- Salt: Just enough to balance all the sweetness and bring out the flavors.
- Powdered sugar: Sifted to keep the royal icing gorgeously smooth—no one likes a lumpy outline.
- Egg whites or meringue powder: Both work great; meringue powder is especially handy if you're cautious about raw eggs or want extra stability in summer heat.
- Cream of tartar: A pinch guarantees your icing stays stiff and shiny for detailed decorating.
- Black gel food coloring: The most vivid (and least runny) way to get that classic cap color.
- Gold edible luster dust + clear alcohol or lemon extract: This duo transforms each cookie into a sparkling treasure—just stir until it's like paint and brush it on gently.
Tired of Takeout? 🥡
Get 10 meals you can make faster than delivery arrives. Seriously.
One email. No spam. Unsubscribe anytime.
Instructions
- Cream and blend:
- Let the butter and sugar dance in the bowl until they're fluffy and pale—your kitchen will smell like a bakery right away.
- Add wet and dry:
- Beat in the egg and extracts, then sprinkle in flour and salt slowly so the dough comes together smoothly but isn't overworked.
- Chill and shape:
- Divvy the dough, flatten into discs, and chill it—this is your secret weapon for crisp shapes later.
- Roll and cut:
- On a lightly floured counter, roll the dough out to a quarter inch, and press out diploma and cap shapes; it's a bit like childhood playdough, but sweeter.
- Bake and cool:
- Arrange on parchment, bake till the edges just blush golden, then let them finish cooling so they stay sturdy for decorating.
- Mix royal icing:
- Whisk the egg whites until frothy, blend in powdered sugar and cream of tartar, and beat till peaks are glossy and hold their shape—this is your decorating canvas.
- Tint and prepare icing:
- Dole out portions for black, white, and gold, tinting carefully; a toothpick works for adding gel color bit by bit.
- Decorate:
- Outline and flood each cooled cookie—don't stress if your hand wobbles, the charm is in the uniqueness—then let them set before moving on.
- Add gold details:
- Mix gold luster dust with a splash of alcohol or lemon, then brush on tassels and ribbons slowly; tiny brush strokes make the accents really shine.
- Dry and serve:
- Let all the icing and gold dry completely before arranging them on a platter, where all the little quirks will make the celebration even sweeter.
 Save
Save  Save
Save The first time I set out these diploma and cap cookies, everyone paused before grabbing one, snapping photos and grinning at the gold sparkles. That little moment—cookies outshining the centerpiece—reminded me how food can make a celebration feel official, no matter how simple the recipe might be.
Choosing the Right Cookie Cutters
Investing in sturdy, clear-edge cutters is a game changer: flimsy cutters can leave you with warped caps or diplomas. If you're feeling creative, improvise with a sharp knife or even a drinking glass for diplomas—just keep the edges clean for the prettiest cookies.
Perfecting Royal Icing Consistency
I learned to test my icing by running a knife through the bowl—if it disappears after ten seconds, it's perfect for flooding. For details, a slightly thicker batch holds lines and dots beautifully, and a bench scraper makes quick work of tidying up any stray icing spills.
Decorating Like a Pro Without the Stress
Layering colors and letting each set saves so much smudging, and I stash a few extra cookies to practice gold accents first. If you're nervous about piping, start with the diplomas—they're forgiving and great for building up confidence.
- Try using toothpicks to nudge icing into corners for clean lines
- Lay baking paper under your cooling rack to catch any gold dust fallout
- Don't worry about perfection: every tassel and swirl only adds personality
 Save
Save 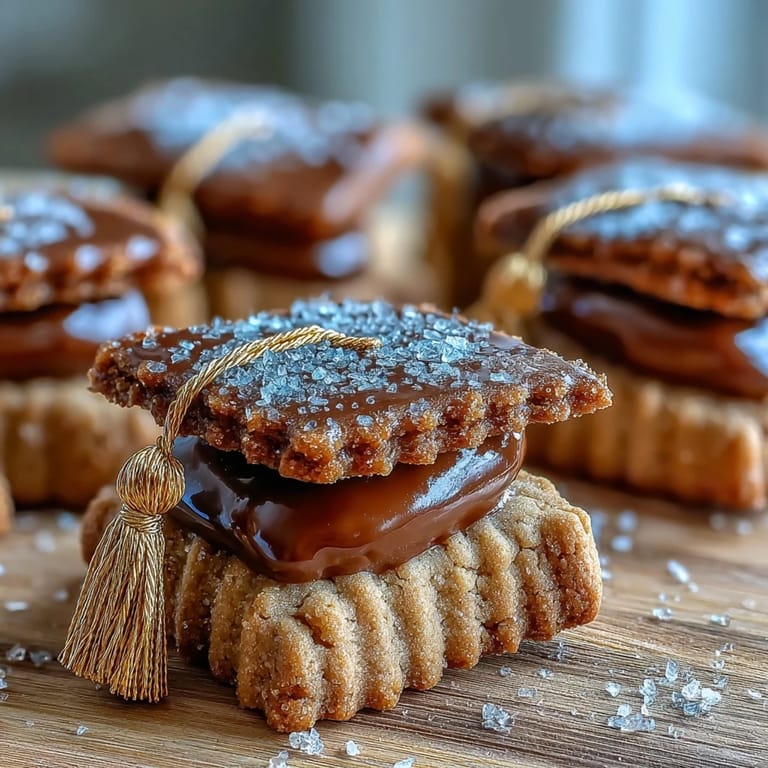 Save
Save Here's to celebrating all the big and small achievements with plenty of cookies and even more smiles. I hope these gold-touched treats bring a little sparkle to your next graduation bash!
Recipe FAQs
- → How do I prevent cookies from spreading?
Chill the dough thoroughly before rolling and again on the sheet if needed. Roll to the recommended 1/4-inch thickness and avoid overworking the dough; use cool baking sheets and a brief bake so edges set quickly.
- → What gives royal icing a smooth flood finish?
Beat icing to the right consistency: slightly thinned for flooding and stiffer for outlines. Use a toothpick to coax air bubbles to the surface, and let outlines set briefly before flooding to keep edges neat.
- → Can I substitute meringue powder for egg whites?
Yes. Use the equivalent meringue powder and water amounts indicated (4 tbsp meringue powder + 6 tbsp water) to achieve a stable royal icing if fresh egg whites are unavailable.
- → How do I apply the gold accents safely?
Mix edible gold luster dust with a few drops of clear alcohol or lemon extract to make a paint. Use a fine food-safe brush for tassels and ribbons, and allow the paint to dry completely before handling.
- → How should decorated cookies be stored?
Once the icing and gold details are fully dry, layer cookies in an airtight container separated by parchment to prevent smudging. Store at room temperature for up to one week.
- → Any tips for crisp edges and tender centers?
A short bake at 350°F until edges are just golden yields crisp edges and a tender center. Avoid overbaking and cool cookies on wire racks to stop carryover cooking.