 Save
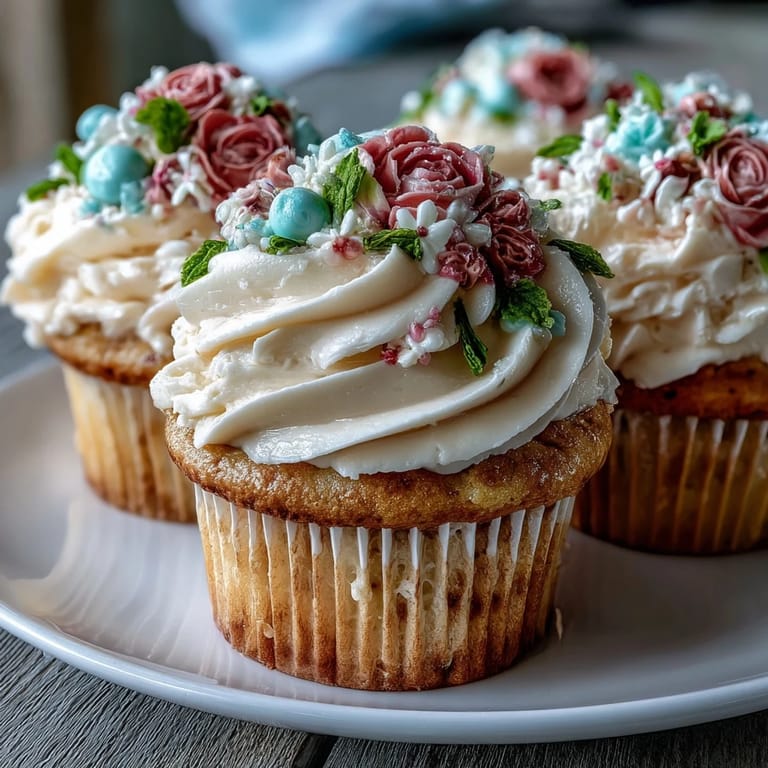
Save My sister called me in a panic three days before her baby shower, voice tight with that specific stress only event planning can create. She needed something that looked like it came from a fancy bakery but tasted homemade, something that would photograph well against pastel tablecloths and make her guests feel celebrated. I found myself in the kitchen that evening, creaming butter and sugar while imagining tiny edible flowers blooming across vanilla clouds, and realized these cupcakes weren't just dessert—they were the anchor to her whole vision.
What got me wasn't just the compliments when those cupcakes arrived at the shower—it was watching my sister's shoulders drop when she saw them, relief washing over her face. One guest asked for the recipe before even tasting one, just based on how they looked sitting there in their cardboard box, and I realized that sometimes the most nourishing thing we bake is someone else's peace of mind.
Ingredients
- All-purpose flour (1 1/4 cups): The foundation that keeps these cupcakes tender without density; sifting isn't required but whisking it with the baking powder ensures even lift.
- Granulated sugar (1 cup): Creaming this with butter for a full 2-3 minutes is the non-negotiable step that creates that light, fluffy crumb everyone loves.
- Unsalted butter, softened (1/2 cup for batter): Room temperature is truly essential here—cold butter won't blend smoothly and warm butter won't trap air properly.
- Eggs, room temperature (2 large): Cold eggs can cause the batter to break and become greasy; take them out while you preheat the oven.
- Whole milk (1/2 cup): The moisture component that keeps these from tasting cakey or dry, though you can substitute buttermilk for tangier flavor.
- Vanilla extract (1 1/2 tsp): Pure extract makes a noticeable difference here; the imitation kind works but feels flat in comparison.
- Baking powder (1 1/2 tsp) and salt (1/4 tsp): These work as a team to lift and balance; don't skip the salt, which enhances sweetness rather than making things salty.
- Unsalted butter for buttercream (1 cup): American-style buttercream relies on this, so softened to room temperature is absolutely critical.
- Powdered sugar, sifted (3 1/2 cups): Sifting removes lumps that create grainy buttercream; this step takes two minutes and changes everything.
- Food coloring gels (pink, yellow, lavender, green): Gel colors are more concentrated than liquids, so they won't thin out your frosting or create muddy shades.
Tired of Takeout? 🥡
Get 10 meals you can make faster than delivery arrives. Seriously.
One email. No spam. Unsubscribe anytime.
Instructions
- Prepare and Preheat:
- Heat your oven to 350°F and line your muffin tin with cupcake liners; this gives the cupcakes structure as they rise and bake. If you rush this step, you'll find some cupcakes sticking to the tin or baking unevenly.
- Whisk the Dry Ingredients:
- In a bowl, whisk together flour, baking powder, and salt until evenly distributed. This isn't about creating air; it's about making sure the leavening is spread throughout so every cupcake rises the same way.
- Cream the Butter and Sugar:
- Beat softened butter with sugar for 2-3 minutes until it looks pale and fluffy, almost like frosting itself. You should be able to see the transformation—the mixture will nearly double in volume and feel light under the beaters.
- Incorporate the Eggs:
- Add eggs one at a time, beating well after each addition so they fully emulsify. If you dump them all in at once, the batter can look curdled and broken, which leads to dense cupcakes.
- Alternate Wet and Dry:
- Add half the flour mixture and mix on low speed until just barely combined, then add the milk, then the remaining flour. This alternating method prevents overmixing, which would develop gluten and make them tough.
- Fill and Bake:
- Divide batter among liners, filling each about 2/3 full, then bake for 18-20 minutes until a toothpick comes out clean. The centers should have the tiniest jiggle but the edges should feel set.
- Cool Completely:
- Let cupcakes cool in the tin for 5 minutes, then transfer to a wire rack and wait until they're completely room temperature. Frosting warm cupcakes will melt and slide right off.
- Beat the Buttercream Base:
- Cream softened butter until it's pale and fluffy, about 1-2 minutes, then gradually add sifted powdered sugar. Go slow with the sugar so you don't create a cloud of powder all over your kitchen.
- Add Flavor and Consistency:
- Mix in vanilla and 2 tablespoons of milk, then add more milk one teaspoon at a time if needed. You want it spreadable but still holding peaks for piping; too thick and the piping becomes exhausting, too thin and nothing holds shape.
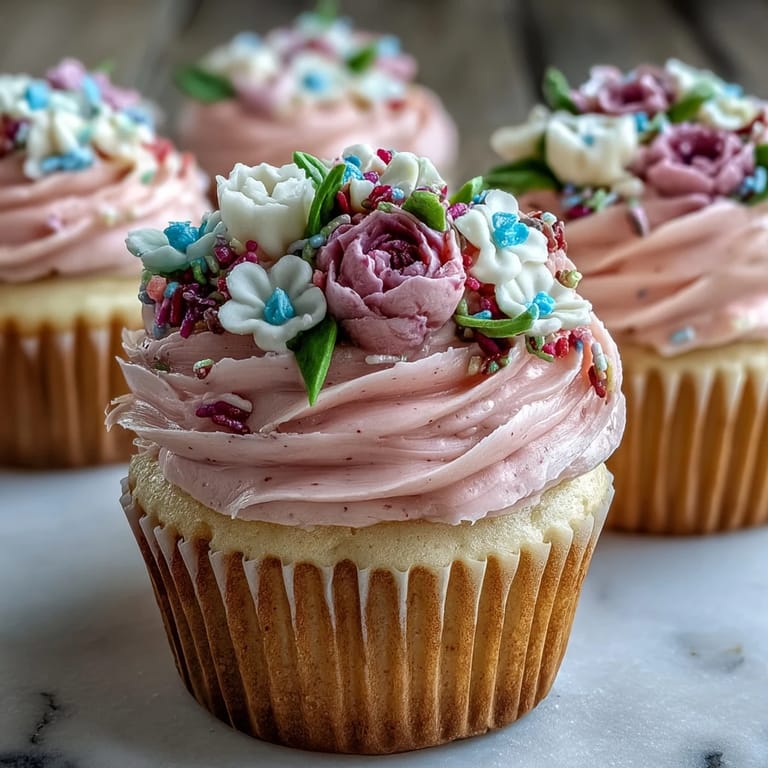
- Tint with Pastels:
- Divide buttercream into bowls and add just a tiny drop of gel color to each, stirring gently to create soft, dreamy pastel shades. The key is restraint—pastels come from less color, not more.
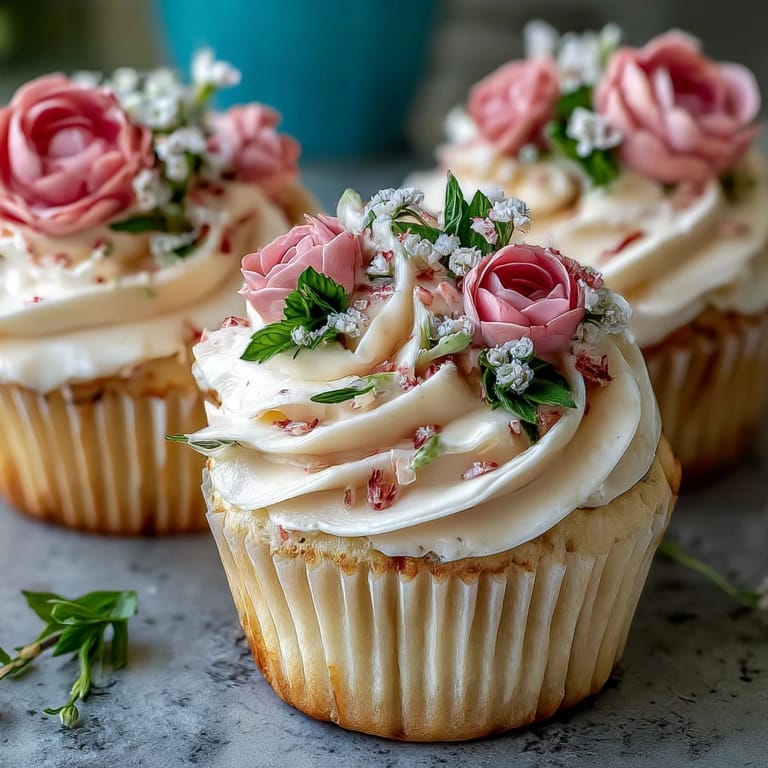
- Pipe the Flowers:
- Fit piping bags with flower tips, fill with colored buttercream, and pipe designs onto cooled cupcakes with whatever pressure and angle feels natural to you. Even imperfect flowers look charming because handmade blooms never look mass-produced.
 Save
Save I decorated these cupcakes while listening to my sister describe her hopes for the baby on the way, and something about the repetitive motion of piping flowers felt meditative and full. These weren't fancy pastry chef creations; they were love made edible and visible, proof that showing up in the kitchen matters.
Why Pastel Buttercream Is Worth the Extra Step
Regular buttercream tastes the same, but pastel buttercream looks like springtime and new beginnings, which is exactly what a baby shower celebrates. The gel coloring doesn't add flavor or change the texture like liquid colors would, so you're purely adding visual magic without any sacrifice to taste. I learned this after trying liquid food coloring once and ending up with watery frosting that wouldn't hold a piped shape, so I'm passing along the lesson that gel is simply better for this application.
Make-Ahead Strategy That Actually Works
These cupcakes are perfect for baking the day before since they stay moist and actually taste better after a day in an airtight container. You can even make the frosting the morning of and chill it, then do all your piping an hour or two before guests arrive so the flowers are fresh and the colors are bright. I've brought these to events where I frosted them in someone's kitchen using their counter as my workspace, which proves they're forgiving enough to handle some logistical flexibility.
The Piping Confidence You Didn't Know You Had
The first time I piped these flowers, I was convinced they looked amateur and considered buying store-bought cupcakes instead, but my sister said they looked like a garden came alive on frosting. Since then, I've realized that imperfect handmade flowers have character that mass-produced ones will never match, and guests respond to the obvious care more than the precision. Wonky roses and slightly tilted leaves are actually proof someone made them for you rather than ordered them from a bakery, which carries its own quiet beauty.
- Start with lighter pressure on the piping bag to let your hand find its natural rhythm before committing to bold swirls.
- If you mess up a flower, smooth it back into the frosting and try again; buttercream is remarkably forgiving.
- Chill the finished cupcakes for 15 minutes so the buttercream sets and holds its shape when transported.
 Save
Save These cupcakes remind me that the most meaningful things we create in the kitchen are rarely about technical perfection but about who we're making them for. Bake these when you want to celebrate someone, knowing that the effort shows and tastes as good as it looks.
Recipe FAQs
- → What is the best way to achieve pastel shades in buttercream?
Use gel food coloring sparingly, adding a little at a time to the buttercream until the desired soft pastel hue is reached without thinning the texture.
- → How do I ensure the cupcakes are moist and tender?
Carefully measure ingredients and avoid overmixing the batter. Incorporating room temperature eggs and butter helps create a smooth, fluffy crumb.
- → Can I store the cupcakes after decorating?
Yes, store decorated cupcakes in an airtight container in the refrigerator for up to three days to maintain freshness and buttercream firmness.
- → What piping tips work best for floral designs?
Use petal and star piping tips to create diverse flower shapes like roses, blossoms, and leaves with smooth, detailed edges.
- → Are there options to make these cupcakes dairy-free?
Substitute unsalted butter and milk with plant-based alternatives, adjusting quantities slightly to achieve similar texture and richness.